
 by Lavathing
Welcome to Healcraft.net’s Restoration Druid Guide! As always, if you have any questions or comments, please comment or tweet us @Healcraft. Please note, this guide is for Restoration Druids in a raid environment. For our Mythic+ and dungeon information, please click here. In addition, we cannot cover every aspect of the class in this guide, so be sure to check out our advanced healing articles for even more information.
SOME OF THIS INFORMATION WILL BE OUT OF DATE. FOR OUR 9.0 PRE-PATCH SURVIVAL GUIDE, PLEASE CLICK HERE!
Introduction
Restoration Druids specialize in healing over time and raid healing abilities. With most abilities being instant cast, Restoration Druids are also great for high movement encounters. We excel at blanketing the raid with healing and providing sustained throughput. Additionally, due to a variety of viable talent choices, Restoration Druids are able to adapt to various situations and encounters.
If you’d like to interact with other druids, head over to the Druid Discord – Dreamgrove! Also, I regularly answer questions and discuss healing topics on twitter, so be sure to follow and shoot me a tweet!
Table of Contents
 Rotation
 Talents
 Essences
 Stats
 Corruption
 Boss Guides
 Addons and Macros
 More Information
Rotation
Note: Healing doesn’t follow a strict rotation and this is more of a guideline. Additionally, this is tailored for raids. Please visit our Mythic+ guide for information regarding dungeons.
1) Keep Lifebloom and a Rejuvenation on the active tank at all times. Lifebloom can be swapped to non-tank targets taking moderate to heavy damage.
2) Use Innervate early and often. This is key to maintain healthy mana efficiency on encounters.
3) Keep Efflorescence down. Usually keeping it in melee is a safe bet. However, if the ranged are taking significant raid damage and are stacked, you can place it in ranged.
4) Consume Omen of Clarity buffs with Regrowth casts.
5) Use Wild Growth when AoE damage goes out on the raid. Wild Growth’s healing rapidly diminishes over time, so the first second is significantly stronger than the last second. Therefore, you want to make sure that you do not precast Wild Growth too far ahead of time.
6) Use Swiftmend to heal moderately to heavily damaged players.
7) Use Rejuvenation as a filler ability on players that are, or are about to, take damage.
8) Use Moonfire, Sunfire, and Wrath as a filler during low periods of damage. Do not underestimate the amount of damage you can contribute to the raid during progression.
Cooldowns
Tranquility – Our signature three minute cooldown ability. Tranquility’s effectiveness and cooldown are greatly impacted by our talent and essence choices (see below). Tranquility’s shortcoming is that you must stand and channel it, due to this, we must plan our Tranquility uses wisely. This ability will almost always be assigned by your raid or heal leader. If not, use this during periods of heavy raid damage.
Ironbark – This external tank cooldown is unique due to its very low cooldown of one minute. While other cooldowns have much larger damage reduction, Ironbark fills the niche of an external that can be used very frequently.
Incarnation: Tree of Life / Flourish – These cooldowns are tied to talent choices. Read below for more information regarding Talents.
Talents
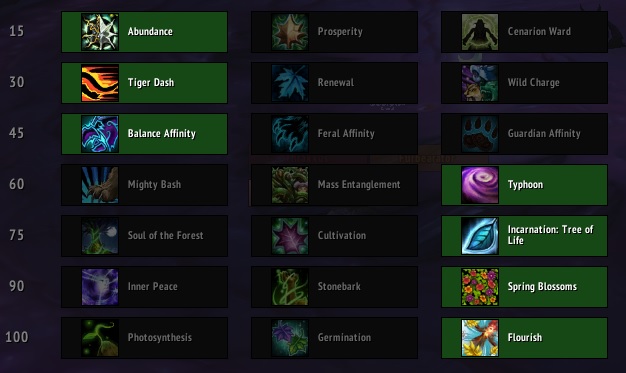
Talent Cheat Sheet
The cheat sheet below is a very generalized talent build suggestion. Due to the situational nature of healing, you’ll likely change talents often. For more detail, read the talent explanations below or scroll down to the Boss Guides section. Additionally, this is tailored for raids. Please visit our Mythic+ guide for information regarding dungeons.
Talents Advanced

Abundance
This is the go-to talent for this row. Each Rejuvenation (include those from Germination) that you have active out on the raid reduces the mana cost of Regrowth by 6% and the critical effect chance is also increased by 6%. Due to us frequently having several Rejuvenations out on the raid at all times, this talent allows you to cast very efficient Regrowths.
Prosperity
This talent is usually only seen as useful when paired with Soul of the Forest (see below). It is important to remember that the two charges of Swiftmend recharge sequentially, not simultaneously. This means that, in effect, this talent provides you with only one extra Swiftmend over the course of the fight. The real value in this talent comes from the cooldown reduction of Swiftmend overall.
Cenarion Ward
A very strong heal that counts towards our Mastery stacks. This talent tends to shine over Abundance in smaller group sizes, such as dungeons or in smaller Normal/Heroic flex raids, where we cannot take advantage of high stacks of Rejuvenations on the raid.

Tiger Dash
I tend to prefer Tiger Dash for most encounters because having a higher frequency of access to a stronger dash. However, Wild Charge also has a lot of potential for good movement. This talent row often comes down to personal preference.
Renewal
Provides a large self heal on a 1.5 minute cooldown. Generally this is the weakest choice for us. However, on some fights where we do not need to move around much, this can be a useful throughput increase.
Wild Charge
Provides a lot of different movement options. Often times this will either be slightly more or less useful than Tiger Dash depending on the encounter. Personal preference.

Balance Affinity
This row of talents can be regularly changed based on what you need. All of these talents provide different utility. Generally, Balance Affinity is the go-to “set it and forget it” talent for its 5 yard increase range on you abilities. This is especially useful on many encounters this tier that require the raid to spread out. Additionally, Balance Affinity can be used to do decent damage and Moonkin form can be used to avoid Polymorph effects.
Feral Affinity
This talent is the best choice for dealing the most amount of damage. This is the normal choice for all Mythic+ and dungeon content, or in raid content where you need more damage than anything else. Please see a more detailed damage rotation with Feral Affinity in our Mythic+ guide.
Guardian Affinity
This talent is useful for its 6% across the board damage reduction. On encounters where you do not need extra range from Balance Affinity, but you are taking large amounts of damage, this can be very useful.

Mighty Bash
This row is entirely up to what utility your group needs! Might Bash provides a strong stun that can also be used as an interrupt on adds that are able to be stunned. Most boss enemies cannot be stunned, so this is often the worst talent on this row in a raid environment.
Mass Entanglement
This row is entirely up to what utility your group needs! Mass Entanglement is very useful on several encounters this tier for doing mass long-term crowd control on enemies that your raid team is not targeting for damage. See specific boss recommendations below.
Typhoon
This row is entirely up to what utility your group needs! Typhoon provides a knockback, slow, and interrupt against enemies that are susceptible to knockback effects.

Soul of the Forest
One of my former favorite talents in expansions past. However, right now Incarnation tends to be favored for most of the encounters due to the value of having an extra healing CD. However, on encounters with steady, continuous damage, Soul of the Forest can provide good throughput. Make sure to always use Soul of the Forest with the Prosperity talent to empower Wild Growth.
Cultivation
One of the weaker talent choices for raid content. Cultivation is valuable because it adds another source of Mastery stacks. However, this tends to be more valuable in smaller group sizes than in raid. This is to go-to talent for Mythic+.
Incarnation: Tree of Life
Incarnation is the strongest overall talent for this tier of content.

Inner Peace
This talent can be very useful on encounters where one of two of the following conditions are met: the raid requires a more frequent use of Tranquility in order to survive or the raid will be too spread out in order to take advantage of Spring Blossoms. See the Boss Guides section below for more specific suggestions.
Stonebark
The weakest talent of this row. There is rarely ever a situation where you would want a slightly lower CD Ironbark with a single target throughput increase over the other two options of this row.
Spring Blossoms
This is the default choice of the row due to its great applicability in the majority of situations and encounters. The primary benefit of Spring Blossoms is the additional heal over time effect that it provides to increase the healing we get from our Mastery. Try to keep your Efflorescence down on a stack of players; melee is usually a safe choice.

Photosynthesis
A very interesting talent that can be very strong in certain situations. This talent provides a benefit based on if your Lifebloom is placed on yourself or on another raid member. If you keep the Lifebloom on yourself, then all of your heal over times will tick 20% faster. If your Lifebloom is on another target, all the heal over time effects on that target give Lifebloom a 5% chance to have a bloom heal triggered. This is usually used only in Mythic+ content.
Germination
This talent gives you the ability to put two Rejuvenations on each target. This helps with single target healing because of an additional Mastery stack being easily accessible. You can take this take this on fights where you need to have a strong single target heal, or in smaller group content such as Mythic+.
Flourish
This is the default choice on this row for raid content. Flourish is an extremely strong 1.5 minute cooldown that extends the duration of your heal over time effects by 8 seconds as well as increasing the heal rate of all of your heal over time effects by 100% for 8 seconds. You want to use Flourish when Wild Growth is about to expire on the raid, or after using Tranquility in order to extend the Tranquility heal over time component on the entire raid.
Essences
The essence builds below are meant to be a general guideline for the most popular and effective load outs.

Essence Builds
The bold essences below indicates that it should be used in the Major Essence slot. The essences that follow the underlined name should be used in the Minor Essence slots.
Low Gear / Mana Management Build: Memory of Lucid Dreams, The Ever-Rising Tide, The Well of Existence, The Formless Void
Good Gear / Maximum Throughput Build: The Ever-Rising Tide, Conflict and Strife, The Well of Existence, The Formless Void
1.5 Minute Tranquility Build: Vision of Perfection, The Ever-Rising Tide, The Well of Existence, The Formless Void
Major
Memory of Lucid Dreams
This is the best choice of a major essence when you do not have a lot of gear and you have issues with your mana. Furthermore, even with good gear, this can be a good major essences on very long encounters. If you have the Forbidden Obsidian Claw, then you always want to use these two together. For specific boss suggestions, please see the Boss Guides section below.
The Ever-Rising Tide
The highest throughput essence; however, it is a very mana greedy choice. This talent is a very good choice for several progression encounters (see below) as well as any fight that is on farm and mana is less of a concern. Effective use of this essence requires good knowledge of damage patterns, knowing how to pre-stack the buff from ERT before the large damage hits. When taking ERT, you always want to have a fully stacked buff before using Tranquility or any other large CD.
Vision of Perfection
A niche choice which allows you to drop the cooldown of Tranquility to as low as 1.5 minutes. Additionally, this can be an ok choice for fights where damage is very consistent and will take advantage of the random Tranquility procs. However, this is usually the weakest of the three major essence choices.
Minor
The Formless Void
This essence has become the standard pick to get the unique 10 corruption resistance from essences. At the start of the expansion, Unwavering Ward was preferred. In patch 8.3 The Formless Void outperforms Unwavering Ward in nearly all scenarios. However, it is important to note that this essence becomes weaker the smaller the group size.
Spirit of Preservation
A very strong single target/tank healing essence that also provides the unique 10 corruption resistance. This is a great choice on any smaller group content. You will almost always want to take this in dungeons and Mythic+, or even in smaller sized Normal/Heroic flex sized raids.
Unwavering Ward
The former go-to choice for the corruption resistance unique effect. However, with current gear levels and encounters in the current patch, this is the weakest of the corruption resistance essences. You will almost never want to take this over The Formless Void or Spirit of Preservation.
Memory of Lucid Dreams
A very weak choice of a minor. While this essence can be useful as a major on long encounters or when you are having mana issues, the minor version of this essences brings very little value. If you are going to use this essence, it should be a major. Furthermore, try to find other ways to fix your mana issues without using this essence.
The Well of Existence
A very strong essence for restoration druids because of the large amount of overhealing that our HoTs typically bring. This minor can do a substantial amount of healing, especially on fights where people are often dipping below the heal threshold. This is recommended on most encounters.
Vision of Perfection
A decent alternative to running this as a major when you need a shorter tranquility cooldown. However, it is often hard to find a slot for this as a minor. Therefore, this has a very niche use when you cannot afford to use it as a major and you require a 1.5 minute cooldown tranquility.
Conflict and Strife
A very strong minor essence. This essence gives you a lot of passive Versatility, which is a solid stat for both throughput and damage reduction. However, this essence requires you to farm rated PvP in order to get rank 3. Due to this, some PvE players may not have access to this essence.
The Ever-Rising Tide
In addition to being an incredibly strong major, this is also one of our best minor choices. ERT as a minor still provides a lot of passive intellect and mana return procs. Due to this, it is almost always preferable as a minor compared to Memory of Lucid Dreams minor. This essence will smartly detect if it is better to provide intellect or mana back to the wearer (depending on your mana levels).
Stats
For a complete best in slot gear guide, please check out our separate post here.
Haste > Critical Strike > Mastery > Versatility >> Intellect
Intellect is a primary stat that provides 1 Spell Power (SP) per point. Spell Power increases how much your spells heal for.
Haste increases casting speed and makes our heal over time abilities have more ticks that occur more frequently.
Mastery increases all our healing to a target based on the number of heal over time effects we have on them.
Critical Strike increases the chance to critically hit with abilities.
Versatility increases all damage and healing done, and decreases all damage taken.
Stat Math
The following information shows you how much second stat rating you need for a 1% increase. These will be heavily modified by corruptions (see below).
1% increase in haste = 68 rating
1% increase in mastery = 131 rating
1% increase in critical strike = 72 rating
1% increase in healing from versatility = 85 rating
Gems & Enchants
Rings: Enchant Ring – Accord of Haste
Weapon: Enchant Weapon – Machinist’s Brilliance. You can switch to Enchant Weapon – Quick Navigation once you have several Expedient corruptions (see below).
Gems: Quick Sand Spinel
Consumables
Food: Baked Port Tato
Potion: Potion of Replenishment for maximum regeneration. If you cannot channel for at least 5 seconds, use Coastal Mana Potion. If you do not need mana, use Superior Battle Potion of Intellect.
Flask: Greater Flask of Endless Fathoms
Augment Rune: Lightning-Forged Augment Rune, or Battle-Scarred Augment Rune if you do not have the reputation.
Race
Alliance: Night Elf, Worgen, and Kul Tiran are able to be Druids in the Alliance. All of the races have similar throughput benefits, so racial choice comes down to personal preference and utility abilities. Assuming a nighttime raid, Night Elf’s 1% Haste provides the best throughput. Kul Tiran is slightly behind with their 1% Versatility and 2% damage taken as a heal over time. Worgen tend to perform the worst, with only 1% Critical Strike.
Horde: Troll, Zandalari Troll, Tauren, and Highmountain Tauren are able to be Druids in the Horde. The Troll Beserking racial is by far the best racial available to the Horde – an on-demand 10% Haste cooldown. Zandalari Troll is behind that with a 4% Critical Strike passive proc. Tauren and Highmountain Tauren are far behind the others in terms of throughput.
Corruption
Corruption Vendor
With the latest major update, you can now buy your corruptions from MOTHER with Echoes of Ny’alotha. To see when each corruption effect will become available in the rotation, please look at Wowhead’s Corruption Vendor Rotation page.
For raiders, the safest option for spending Echoes of Ny’alotha is to spend them all on Expedient III (for 5,000 Echoes) whenever it is available. You can also buy Expedient I and Expedient II in order to round out your total levels of corruption without going too high too quickly.
Best Corruptions
- Expedient – This is the best corruption for most scenarios for raiding builds. It is important to remember that each individual point of haste becomes more valuable (up to a threshold) with more Expedient corruptions. Therefore, it is best to stick to one of the stat boosting corruptions (Expedient, Severe, Masterful) per build rather than mixing and matching them. Expedient will help your healing by drastically reducing cast times, GCD, and by increasing the rate at which your heal over time effects tick.
- Severe – Critical Strike is also a viable build for raiding restoration druids. This build tends to shine on encounters and in situations where Tranquility has a disproportional percentage of your overall healing, or is required to heal through particular mechanics/phases. As mentioned above, it is important to either go fully Severe or Expedient and not to mix-and-match the two builds.
- Masterful – Mastery is our best stat in smaller group sizes. Typically, you only want to use a Masterful build for dungeon and Mythic+ content. However, Masterful is also very strong in Normal/Heroic flex raiding when the raid size is smaller. Furthermore, Mastery provides the highest amount of single target tank healing of the three main builds.
- Racing Pulse – This corruption can be useful in the early stages of gearing when your levels of haste rating on gear is still low. However, as you gain more haste rating, Expedient starts to rapidly outperform Racing Pulse. Furthermore, it is important to recognize that healers typically benefit less compared to other roles from random proc type benefits because they might proc during times where increased healing is not needed, and therefore wasted. Healers will always prefer passive increases or active on-use benefits to random proc benefits (when all other variables are controlled).
- Void Ritual – Void Ritual is another corruption that can be very useful while you are in lower end gear. The proc gives you a good amount of all secondary stats, and the proc chance increases when other party members are also running Void Ritual. This was originally very strong at the start of this tier when many classes ran Void Ritual. However, since the introduction of the corruption vendor, far fewer people run this corruption and therefore make it less powerful on average. Furthermore, the passive stat boosting corruptions listed above will always be more powerful in raid level gear than Void Ritual for the same reasons listed under “Racing Pulse” above.
Boss Guides
The suggested talent builds for the fights below are meant to provide the best assistance to the raid team during progression. These are not the only viable talents, and various talent combinations work for many of these fights. Also, remember that the talents are selected to maximize the potential for success on progression, not for parsing. Finally, many talents are situational and are better for different raid teams, strategies, and healing compositions. Do not take these talent suggestions as law, they can be changed based on the individual situation.
 Wrathion, The Black Emperor
Important Talents
Tiger Dash, Incarnation: Tree of Life, Spring Blossoms, Flourish
Essences
The Ever-Rising Tide, The Formless Void, Conflict and Strife, The Well of Existence
Healing Strategy
This fight has a decent amount of movement, especially if you are on soaking duty; therefore, Tiger Dash can be very useful for getting around quickly. It is very important to remember that on Mythic, shapeshifting will remove stacks of the movement debuff. This makes Mythic mode essentially Heroic mode for Druids in terms of mechanics. In terms of healing, the primary sources of damage will be from the Incineration debuffs and Gale Blast. You can pre-stack your ERT major essence before these go out in order to boost healing. Additionally, these are good times to use Incarnation and Tranquility.
 Maut
Maut
Important Talents
Renewal, Incarnation: Tree of Life, Spring Blossoms, Flourish
Essences
The Ever-Rising Tide, The Formless Void, Conflict and Strife, The Well of Existence
Healing Strategy
The majority of the healing on this fight will occur during the stone skin phase, when the DPS takes a lot of reflected damage. During this phase you want to start out with using Incarnation, ERT major, Innervate, and spam Rejuvenation in order to get maximum stacks of the ERT healing buff. Afterwards, you want to use Tranquility and immediately follow it up with Flourish. This way, your tranquility heal over time effect will be extended on the raid for the majority of the stone skin phase. Continue to use Wild Growth and Rejuvenation often for the rest of the phase. It is important to remember that the mana orb mechanic on this fight means that you are unlikely to run out of mana, so keep spamming those abilities!
 The Prophet Skitra
Important Talents
Mass Entanglement, Incarnation: Tree of Life, Spring Blossoms, Flourish
Essences
The Ever-Rising Tide, The Formless Void, Conflict and Strife, The Well of Existence
Healing Strategy
Mass Entanglement is very important for encounter so you can control the Images of Absolution. Mass Entanglement is the best way to handle these in the entire game. For healing, there are only two abilities/phases which you need to keep track of – Shred Psyche and Illusionary Projection. Shred Psyche happens during the first phase, and does a large amount of raid damage shortly after the add spawns and finishes its cast. You want to pre-stack your ERT major and cast Wild Growth right as the add finishes its cast. During progression, you want to save your Incarnation and Tranquility for the phase two stage where the raid takes increasing sustained damage. However, if you are very efficient with these phases, you can use your big cooldowns for Shred Psyche.
 Dark Inquisitor Xanesh
Important Talents
Renewal, Incarnation: Tree of Life, Spring Blossoms, Flourish
Essences
The Ever-Rising Tide, The Formless Void, Conflict and Strife, The Well of Existence
Healing Strategy
This is a very boring fight to heal. There is not much going on if everyone properly moves away from the damaging mechanics. However, use your cooldowns early and often for maximum efficiency. Healers are also often chosen to kick the ball because the reduced damage debuff effects us less negatively.
 The Hivemind
Important Talents
Renewal, Incarnation: Tree of Life, Spring Blossoms, Flourish
Essences
Vision of Perfection, The Formless Void, The Ever-Rising Tide, The Well of Existence
Healing Strategy
This fight has a lot going on and a lot of different sources of nearly constant raid damage. However, the most damaging ability is when the bosses switch control of The Hivemind and trigger the Devouring Frenzy ability. During this time you will want to use your cooldowns. Other damaging abilities are Echoing Void and when Aqir Darters spawn. Avoid Acidic Aqir’s when the roll around the room. Finally, you can use Ursol’s Vortex when the Aqir Drones spawn to keep them under one of the bosses for cleave.
 Shad’har the Insatiable
Important Talents
Renewal, Incarnation: Tree of Life, Spring Blossoms, Flourish
Essences
Memory of Lucid Dreams / The Ever-Rising Tide, The Formless Void, The Ever-Rising Tide, The Well of Existence
Healing Strategy
This is another fight with fairly consistent damage throughout. Although, the second phase (66%->33%) has the most amount of damage. You’ll want to save most of your cooldowns for this phase. Depending on how you feel your mana is, you can take either Memory of Lucid Dreams or The Ever-Rising Tide as a major essence. Whenever someone has a four-stack of the Spit debuff on them, you want to make sure to heal them and potentially use Ironbark on them as well. They will be taking heavy damage until the expiration of the debuff. Finally, on Mythic difficulty, when the Living Miasma targets you, you receive a heavy slow. However, shapeshifting will remove this slow from you.
 Drest’agath
Important Talents
Inner Peace, Incarnation: Tree of Life, Flourish
Essences
Vision of Perfection, The Formless Void, The Ever-Rising Tide, The Well of Existence
Healing Strategy
Having a short cooldown on Tranquility really shines on this encounter. Due to this, we recommend taking both the Inner Peace talent and running the Vision of Perfection essence. With both of these, you will have a 1.5 minute cooldown on Tranquility. This will help you heal through the frequently occurring Throes of Agony and Entropic Crash. On this fight, guilds will typically set up a melee and ranged group. The melee will be running from tentacle to tentacle. However, in order to hit the tentacle, they will be located in a smoke cloud. This makes it difficult to heal them from the outside (where most Restoration Druids will be located; Holy Paladin and Mistweaver Monks are the preferred healers for the melee group). Despite this, Restoration Druids have a few tools that can help them heal the melee group without needing to step into the smoke cloud. First, you can place your Efflorescence under the tentacle and this will heal the melee inside of the cloud. Second, if you are standing outside of the smoke cloud, but within 40 yard range of the melee, both Wild Growth and Tranquility will bounce into the smoke bomb. Meaning, if you target yourself with Wild Growth, the other heal over time effects can jump onto the players inside the cloud. Try to use these tricks to help your melee healer out!
 Il’gynoth, Corruption Reborn
Important Talents
Mass Entanglement, Inner Peace, Incarnation: Tree of Life, Flourish
Essences
Memory of Lucid Dreams / Vision of Perfection, The Formless Void, The Ever-Rising Tide, The Well of Existence
Healing Strategy
Your healing strategy for this encounter will greatly depend on which overall strategy that your raid team is going to use. Teams continue to use both the no dispel and dispel strategies. If you go with not dispelling, then the raid team will be much more spread out. Whereas, if you are dispelling, you should have range on more people. If you are not dispelling, you will also have more mana free to use and not have to take Memory of Lucid Dreams for extra regeneration. However, if you are dispelling, you may want to consider taking Memory of Lucid Dreams as a major to help you with mana. With that said, the lower CD on Tranquility is far more preferable than Spring Blossoms on this fight due to the spread out nature. Use yours cooldowns early and often, as the damage tends to be fairly consistent throughout the encounter. Also, Mass Entanglement is essential for helping your raid crowd control the blood adds during the final phase of the encounter.
 Vexiona
Important Talents
Incarnation: Tree of Life, Spring Blossoms, Flourish
Essences
The Ever-Rising Tide, The Formless Void, Conflict and Strife, The Well of Existence
Healing Strategy
For the majority of this encounter, there will not be much to heal. However, our talent and essence build is meant to maximize throughput during the final 40% burn phase where damage severely ramps up. During Phase 1, you will mostly be worried about properly dispelling Annihilation stacks off the tank, and keeping the Despair debuffed tank topped on health. The only sources of damage should be the raid wide moderate damage that goes out when a Dark Gateway spawns (try to pre-cast Wild Growth to go off right as the gateways spawn) and any adds that are not properly dealt with. Try to use Tranquility and Incarnation early as to put them on CD so they will be up again for the final burn phase. You’ll want to fully stack your ERT prior to each Heart of Darkness cast, as this is the primary source of damage during this encounter. Incarnation is very useful during these casts as well, as you’ll need to be moving as it goes out.
 Ra-den the Despoiled
Important Talents
Renewal, Incarnation: Tree of Life, Spring Blossoms, Flourish
Essences
The Ever-Rising Tide, The Formless Void, Conflict and Strife, The Well of Existence
Healing Strategy
This encounter has a lot of good opportunities to show off your healing. Each time a round of orbs spawn, you’ll want to immediately start stacking your ERT. This is because, most of the orbs will do some sort of ability which requires healing right after they hit the boss. The most important is when the Void orb hits the boss, and the entire raid receives a healing absorb debuff. You will want a fully stacked ERT + Tranquility to heal through this absorb as quickly as possible. Additionally, the other orbs (Vita/Nightmare) also do significant raid damage when they are absorbed by the boss. High stacks of ERT with a Wild Growth and Flourish will make quick work of this. Flourish will be up for every orb spawn, so make sure to use it there. In the final phase, be careful not to heal players afflicted with the Corrupted Existence debuff too much. However, you do not want to completely ignore them. Prevent them from dying, but never come close to topping them off. You’ll also want to be especially careful not to heal yourself too much if you are targeted with Corrupted Existence, because you will already be getting healed by your Ysera’s Gift.
 Carapace of N’Zoth
Important Talents
Tiger Dash, Incarnation: Tree of Life, Spring Blossoms, Flourish
Essences
Memory of Lucid Dreams, The Formless Void, The Ever-Rising Tide, The Well of Existence
Healing Strategy
On Mythic difficulty, the vast majority of the healing on this encounter will be centered around consistent damage in Phase 2 and bursts of damage during Phase 3. Due to the long and taxing nature of the fight, I recommend taking Memory of Lucid Dreams as a major during progression. During Phase 1, there is not much to heal. The only major source of damage is when the Gaze of Madness adds target players with Breed Madness. This should be interrupted by DPS and not be a major issue. Despite this, you will want to use Tranquility and Incarnation during Phase 1 in order to put them on CD early and able to be used during Phase 3. During Phase 2, you will be dealing with fairly regular damage from Mind Bombs, Mental Decay, Mycelial Cysts, and Eternal Darkness casts. However, most strategies require you to save your large CDs for the final phase. Due to this, try not to use Incarnation or Tranquility until Phase 3, but feel free to use Flourish off CD to heal through Eternal Darkness. During the final phase, your cooldowns will likely be assigned by your raid leader. However, if they are not, here are some tips for usage – you want to make sure to Wild Growth + Flourish right before Infinite Darkness hits the raid. Also, Incarnation is very strong to use during Infinite Darkness because you will be moving and being able to instant cast Regrowths to save people will be helpful. Finally, because it is difficult to use Tranquility on Infinite Darkness, you can use it after Insanity Bomb goes off. However, you will need to be careful about grabbing too much aggro on the Nightmare Antigen which spawn. Ask a Paladin for a BoP to avoid death to aggro.
 N’Zoth the Corruptor
Important Talents
Incarnation: Tree of Life, Spring Blossoms, Flourish
Essences
Memory of Lucid Dreams, The Formless Void, The Ever-Rising Tide, The Well of Existence
Healing Strategy
When you first start progressing on this encounter, it will seem like there is a lot of damage constantly going out. However, as you progress, the damage will go down drastically as your raid handles the various mechanics properly. As with Carapace of N’Zoth above, most of your major cooldowns on this encounter are likely to be assigned; but, I will add suggestions here just in case they are not. Before each Paranoia+Torment combo, which is the deadliest moments while upstairs in Phase 1, you want to use a major raid cooldown. If you are not assigned to Tranquility, you will want to use Wild Growth + Flourish. If you are assigned to a Psychus group, you will want to make sure to have Incarnation available for healing that group. Furthermore, you are able to do a large amount of damage to Psychus during these phases to make sure your raid meets the DPS check. Keep Sunfire/Moonfire on Psychus, and weave in Wraths as often as possible. Finally, if you have it, you will want to use Forbidden Obsidian Claw once Psychus has reached at least 6 stacks. This, on its own, will do around 3 million damage.
In Phase 2, the major sources of damage are Evoke Anguish and Harvest Thoughts. Tranquility is good for Harvest Thoughts, because you are standing still. However, you will want to use Incarnation for Evoke Anguish, as you will be needing to move often before and during the effect. Once you reach the secret mythic-only phase, you should be close to a kill. Try to contribute to boss damage during Shattered Ego phases and the secret phase, as there is not much healing to be done.
Addons & Macros
Raid Frames

The primary addon for any healer should be their raid frames. There are several good raid frame addons available. The differences come down to personal preference. I recommend one of the following:
WeakAuras 2
One of the most useful addons in the game. This allows you to track CDs, buffs, mechanics, timers, and much more. Most guilds require this addon so players can import custom made strings for particular bosses.
WeakAura 2 Strings
Most WeakAuras can be found on Wago.io. You can also use the WeakAuras desktop client to keep your auras automatically up to date.
Macros
Basic Mouseover Macro
Allows you to cast a spell on an ally by hovering over their raid frame and hitting the associated keybind. Replace SPELL with a spell name.
#showtooltip SPELL

/cast [@mouseover,help,nodead] SPELL
More Information
For more advanced information regarding healing, please check out our various other articles!
In our tips and tricks series of articles we provide unique and interesting tips and tricks for healers on specific encounters. Which talent should you take on a particular fight? How do you deal with a certain mechanic given your toolkit? All of these are explained in the tips and tricks series!
Our encounter guides are different from other standard mass-produced guides because they focus primarily on the healer perspective. How is this different from the tips and tricks articles mentioned above? Tips and tricks focuses on advice for a specific class or specialization on an encounter. However, the encounter guides are more board and are aimed to help raid/healing leads understand all the healing details of a fight.
Self-explanatory! Our best in slot lists are constantly updated following hot-fixes, patches, or anything else that alters what gear we are going after. Don’t worry about doing all the tricky math, we’ll do it for you.
Almost everything else can be found on our theorycraft page! Many of our readers found us through our various spreadsheet work (example 1 & 2), and we plan to continue to provide the community with great tools to evaluate their healers.
Conclusion
Thanks for checking out our Restoration Druid guide! We hope that it was helpful for you and your raid team. If you have any questions please comment below or tweet us @Healcraft. We will attempt to answer them as soon as possible. As always, if you believe anything to be inaccurate or out of date, please let us know! Finally, there is only so much you can include in one healing guide, so be sure to check out all of our advanced healing resources. Again, thanks for reading and Happy Healing!

One comment